Search This Blog

Showing posts with label cacti. Show all posts

How to Install Cacti on CentOS 8

Update System

dnf update -y

Install Apache

dnf -y install httpd httpd-devel

Install SNMP and RRDTool

dnf -y install net-snmp net-snmp-utils net-snmp-libs rrdtool

Restart service and enable service to start on boot time.

systemctl restart snmpd
systemctl enable snmpd

Install PHP Extension

dnf -y install php php-xml php-session php-sockets php-ldap php-gd php-gmp php-intl php-mbstring php-mysqlnd php-pdo php-process php-snmp

Change PHP Settings

vi /etc/php.ini

date.timezone = Asian/Phnom_Penh
memory_limit = 512M
max_execution_time = 60

Restart services

systemctl restart httpd
systemctl restart php-fpm

Enable services to startup on boot time.

systemctl enable httpd
systemctl enable php-fpm

Install MariaDB

dnf -y install mariadb-server

Restart and Enable to startup on boot time.

systemctl restart mariadb
systemctl enable mariadb

Secure MariaDB by setting a password.

mysqladmin -u root password your_strong_password

Create a Database for Cacti. Login into the database with a password just set at the moment.

mysql -u root -p

create database cacti;
GRANT ALL ON cacti.* TO cactiuser@localhost IDENTIFIED BY 'p@$$w0rd';
flush privileges;
exit;

Import time.zone table into default database.

mysql -u root -p mysql < /usr/share/mariadb/mysql_test_data_timezone.sql

Grant permission to cactiuser on the timezone table.

mysql -u root -p

GRANT SELECT ON mysql.time_zone_name TO cactiuser@localhost;
flush privileges;
exit;

Optimize Database

vi /etc/my.cnf.d/mariadb-server.cnf

Put the following lines under the [mysqld] section.

collation-server = utf8mb4_unicode_ci
character-set-server=utf8mb4
max_heap_table_size = 64M
tmp_table_size = 64M
join_buffer_size = 64M
innodb_file_format = Barracuda
innodb_large_prefix = 1
innodb_flush_log_at_timeout = 3
innodb_buffer_pool_size = 1GB
innodb_buffer_pool_instances = 10
innodb_read_io_threads = 32
innodb_write_io_threads = 16
innodb_io_capacity = 5000
innodb_io_capacity_max = 10000

Install Cacti from the EPEL repository. First, we need to enable epel-release into the CentOS repository.

dnf -y install epel-release

Install Cacti

dnf -y install cacti

Configure Cacti

Edit the Cacti's configuration file and specify the database name, database username and password accordingly.

vi /usr/share/cacti/include/config.php

/* make sure these values reflect your actual database/host/user/password */
$database_type = "mysql";
$database_default = "cacti";
$database_hostname = "localhost";
$database_username = "cactiuser";
$database_password = "p@$$w0rd";
$database_port = "3306";
$database_ssl = false;

Import the Cacti database into our database name cacti.

mysql -u root -p cacti < /usr/share/doc/cacti/cacti.sql

Enable Cron Job

Create a cron job to schedule Cacti runs its poller every 5 minutes.

vi /etc/cron.d/cacti

*/5 * * * * apache /usr/bin/php /usr/share/cacti/poller.php > /dev/null 2>&1

Allow remote access

By default, Cacti allows only the localhost to access. To allow remote access please make the change as follow.

vi /etc/httpd/conf.d/cacti.conf

Alias /cacti /usr/share/cacti
<Directory /usr/share/cacti/>
            <IfModule mod_authz_core.c>
                         # httpd 2.4
                         Require all granted
            </IfModule>
            <IfModule !mod_authz_core.c>
                         # httpd 2.2
                         Order deny,allow
                         Deny from all
                         Allow from all
            </IfModule>
</Directory>

Allow Firewall and SELinux

firewall-cmd --permanent --add-service=http
firewall-cmd --reload

SELinux

sed -i 's/enforcing/disabled/g' /etc/selinux/config
setenforce 0

Restart service

systemctl restart mariadb httpd

Setup Cacti

Open your favorite browser and type http://server_ip/cacti. The default username is admin and password admin.


Cannot log in with the default username and password. Please follow the following steps.

vi /usr/share/cacti/include/config.php

Comment the following line by putting the hash sign (#) in the front.

#$cacti_cookie_domain = 'cacti.net';

Then, change the current password to the new secure password.


Check the License Agreement box and Begin.


Cacti check all the following requirements like PHP Setting, Timezome, Database running and Next.


Select the installation type and Next.


Directory Permission Checks, Cacti check all the directories permission that is required by Cacti and Next.


Specify the Critical Binary Location that will be used by Cacti and Next.


Read the security enhancement of Cacti, check the box below and Next.


Default profile, just keep it default and Next.


The default templates that will be installed and Next.


Cacti validate the database collation if any warning about the database, we can fix by follow the message here, Next.


Confirm the installation and Install.


Click on Get Started to finish.


Our Cacti installation is Done.


How to reset Cacti admin password

For our daily work, we will meet the problem like forgot Cacti admin password by unplanned. In this  post, will you all to reset Cacti admin password. Login into our database mysql -u root -p

use cacti;
update user_auth set password=MD5('NEWPASSWORD') where username='admin';
flush privileges;
exit;

Restart database.

systemctl restart mariadb

Conclusion
I hope this post will be helpful for you. You may also like the related post:

READ: Monitor Linux and Windows
READ: How to create Graph Tree on Cacti
READ: How to Install Plugin on Cacti
READ: Notification on Cacti

READ: How to install Cacti on Centos 7
READ: How to install Cacti on Debian 10

READ: How to compile Cacti spine on Debian

How to compile Cacti spine on Debian

Spine, formerly Cactid, is a poller for Cacti that primarily strives to be as fast as possible. For this reason it is written in native C, makes use of POSIX threads, and is linked directly against the net-snmp library for minmumal SNMP polling overhead. Spine is a replacement for the default cmd. 
In this post, we show how to compile Cacti-spine on Debian 10. 

Install dependencies

apt-get -y install g++ gcc libssl-dev libsnmp-dev help2man default-libmysqlclient-dev build-essential automake libtool dos2unix

Download Cacti-Spine Source

wget https://www.cacti.net/downloads/spine/cacti-spine-1.2.2.tar.gz

Extract Cacti-Spine source.

tar -xzf cacti-spine-1.2.2.tar.gz
cd cacti-spine-1.2.2

Compile Cacti-Spine with below command.

./bootstrap
./configure
make
make install
chown root:root /usr/local/spine/bin/spine
chmod u+s /usr/local/spine/bin/spine

Create new file name /usr/local/spine/etc/spine.conf.

vim /usr/local/spine/etc/spine.conf

Paste the following line and change the database username and password based on our cacti database.

DB_Host localhost
DB_Database cacti
DB_User cactiuser
DB_Pass cactipassword
DB_Port 3306
#DB_UseSSL 0
#RDB_SSL_Key
#RDB_SSL_Cert
#RDB_SSL_CA

Go to Cacti web interface => Settings => Paths and fill in the follow fileds.


To change cmd.php to spine for Cacti polling option. Go to Poller and change to Spine.


Conclusion

Spine, formerly Cactid, is a poller for Cacti that primarily strives to be as fast as possible. For this reason it is written in native C, makes use of POSIX threads, and is linked directly against the net-snmp library for minmumal SNMP polling overhead. 
I hope you all be able to understand this post well. If you don't understand any point or  have any problem, recommendation, suggestion don't hesitate to tell us, we will try our best to help. You may also like Related Posted:

READ: Monitor Linux and Windows
READ: How to create Graph Tree on Cacti
READ: How to Install Plugin on Cacti
READ: Notification on Cacti

READ: How to install Cacti on Centos 7
READ: How to install Cacti on Debian 10

How to install Cacti on Debian 10

Cacti is a complete frontend to RRDTool, it stores all of the necessary information to create graphs and populate them with data in a MySQL database. The frontend is completely PHP driven. Along with being able to maintain Graphs, Data Sources, and Round Robin Archives in a database, cacti handles the data gathering. Mostly, Cacti user SNMP to query and gathering for the information about the network device's resources. In this post, we demonstrate how to install Cacti on Debian 10.

Modify Repository

nano /etc/apt/sources.list

For Debain 10 Buster

deb http://deb.debian.org/debian/ buster main
deb http://security.debian.org/debian-security buster/updates main
# buster-updates, previously known as 'volatile'
deb http://deb.debian.org/debian/ buster-updates main

Update our system

apt -y update

Install Apache2 and PHP module

apt install -y vim apache2 libapache2-mod-php php-xml php-ldap php-mbstring php-gd php-gmp php-mysql

Change PHP setting

To verify the current time zone on our system ls -l /etc/localtime.

vim /etc/php/7.3/apache2/php.ini

AND

vim /etc/php/7.3/cli/php.ini

date.timezone = Asia/Phnom_Penh
memory_limit = 512M
max_execution_time = 60

Install SNMP and RRDTool

apt install -y snmpd php-snmp rrdtool librrds-perl

Install MariaDB

apt install -y mariadb-server mariadb-client

Customize MariaDB setting to get better performance. Place the following lines under [mysqld] section.

vim /etc/mysql/mariadb.conf.d/50-server.cnf

collation-server=utf8mb4_unicode_ci
character-set-server=utf8mb4
max_heap_table_size = 128M
tmp_table_size = 64M
join_buffer_size = 64M
innodb_file_format = Barracuda
innodb_large_prefix = 1
innodb_buffer_pool_size = 1GB
innodb_buffer_pool_instances = 10
innodb_flush_log_at_timeout = 3
innodb_read_io_threads = 32
innodb_write_io_threads = 16
innodb_io_capacity = 5000
innodb_io_capacity_max = 10000

Restart MariaDB service

systemctl restart mariadb

Create a database and database user for Cacti. Login into our database.

mysql -u root -p

create database cacti;
GRANT ALL ON cacti.* TO cactiuser@localhost IDENTIFIED BY 'cactipassword';
flush privileges;
exit;

Import the timezone table into default databases.

mysql -u root -p mysql < /usr/share/mysql/mysql_test_data_timezone.sql

Grant permission for cactiuser on the default database. Login into our database.

mysql -u root -p

GRANT SELECT ON mysql.time_zone_name TO cactiuser@localhost;
flush privileges;
exit;

Install Cacti

There are two ways to install Cacti:

       Method #1 Install Cacti from the repository

We can install Cacti from the repository of Debian with apt -y install cacti. The latest stable Cacti version will be installed.

apt install -y cacti

Choose web service for Cacti, we use apache2 as web service, so press Tab to select OK.


Cacti ask for database configuration if we choose Yes, Cacti automatically configuration database for us. We want to configure a database by our hand so choose No.


Import database into MariaDB.

mysql -u root -p cacti < /usr/share/doc/cacti/cacti.sql

Configure username, password and database name for Cacti.

vim /usr/share/cacti/site/include/config.php

$database_type = 'mysql';
$database_default = 'cacti';
$database_hostname = 'localhost';
$database_username = 'cactiuser';
$database_password = 'cactipassword';
$database_port = '3306';
$database_ssl = false;
$database_ssl_key = '';
$database_ssl_cert = '';
$database_ssl_ca = '';

Change ownership on Cacti's directories to apache user (www-data)

chown -R www-data.www-data /usr/share/cacti/site/resource/snmp_queries/
chown -R www-data.www-data /usr/share/cacti/site/resource/script_server/
chown -R www-data.www-data /usr/share/cacti/site/resource/script_queries/
chown -R www-data.www-data /usr/share/cacti/site/scripts/

Cron job

/etc/cron.d/cacti

MAILTO=root
*/5 * * * * www-data php /usr/share/cacti/site/poller.php 2>&1 >/dev/null | if [ -f /usr/bin/ts ] ; then ts ; else tee ; fi >> /var/log/cacti/poller-error.log

       Method #2 Install Cacti Manually

When we install Cacti from the repository based on OS, the Cacti latest stable version in the repository will be installed. Sometimes we want to install Cacti by a specific version based on our requirement. So, we can manually install Cacti from the source.  First, download the Cacti source from the Cacti site https://www.cacti.net/downloads. Select which version we want to install, in this guide we will install cacti-1.2.2.

Download the Cacti source.

wget https://cacti.net/downloads/cacti-1.2.2.zip

Extract the Cacti source.

unzip cacti-1.2.2.zip

Move Cacti to DocumentRoot of apache.

mv cacti-1.2.2 /var/www/html/cacti

Change ownership to apache user (www-data). Move Cacti to DocumentRoot of apache.

chown -R www-data.www-data /var/www/html/cacti

Import Cacti database

mysql -u root -p cacti < /var/www/html/cacti/cacti.sql

Configure username, password, and database name for Cacti.

vim /var/www/html/cacti/include/config.php

$database_type = 'mysql';
$database_default = 'cacti';
$database_hostname = 'localhost';
$database_username = 'cactiuser';
$database_password = 'cactipassword';
$database_port = '3306';
$database_ssl = false;
$database_ssl_key = '';
$database_ssl_cert = '';
$database_ssl_ca = '';

Create a Cron job

Cacti need to run its poller regularly, so we need to schedule it with cron job.

echo '*/5 * * * * www-data /usr/bin/php /var/www/html/cacti/poller.php > /dev/null 2>&1' >/etc/cron.d/cacti

Setup Cacti

Open favorite web browser and type http://server_ip/cacti . Default username and password (admin: admin) and change a new password.


Check the box Accept GPL License Agreement and Begin. 


This step the Cacti validates the PHP and MySQL setting,  if there is any recommendation will be shown here. Next.


Keep the default settings. Next.


Directories permission, Cacti check the directories permission all directories should be granted to www-data apache user. Next. 


Critical Binary that Cacti will use to function its operation properly. If any binary missing Cacti will show here.


Default Profile. Next. 


This is the default template that will be created with the Cacti installation. Next.


This is the warning from our database setting. we can keep it default. Next. 


Confirm Installation and Install.


We are almost done here, Get Started to finish our installation.


We are done for Cacti Installation.


Conclusion

Cacti is a web-based open-source monitoring system, that provides the graphing solution by RRDTool. We can use Cacti to monitor network traffic, system resource like CPU, RAM, HardDisk, and so on. I hope you all be able to understand this post well. If you don't understand any point or have any problem, recommendation, the suggestion doesn't hesitate to tell us, we will try our best to help. You may also like Related Posted:

READ: Monitor Linux and Windows
READ: How to create Graph Tree on Cacti
READ: How to Install Plugin on Cacti
READ: Notification on Cacti

How to Compile Cacti-Spine on Centos 7

Compile Cacti-Spine

Install dependencies.

yum install -y libdb-devel.x86 httpd-devel net-snmp-devel openssl-devel perl-devel rpm-devel mariadb-devel libtool help2man dos2unix

Download Cacti-Spine.

wget https://www.cacti.net/downloads/spine/cacti-spine-1.2.10.tar.gz
tar xzf cacti-spine-1.2.10.tar.gz
cd cacti-spine-1.2.10

Compile with the command below.

./bootstrap
./configure
make
make install

Permission and ownership.

chown root:root /usr/local/spine/bin/spine
chmod u+s /usr/local/spine/bin/spine

Create new file name /usr/local/spine/etc/spine.conf.

vi /usr/local/spine/etc/spine.conf

Paste the following line and change the database username and password based on our cacti database.

DB_Host localhost
DB_Database cacti
DB_User cactiuser
DB_Pass cactipassword
DB_Port 3306
#DB_UseSSL 0
#RDB_SSL_Key
#RDB_SSL_Cert
#RDB_SSL_CA

Go to Cacti web interface => Settings => Paths and fill in the following fields.


To change cmd.php to spine for Cacti polling option. Go to Poller and change to Spine.


Conclusion
Spine is a replacement for the default cmd.php poller so you must decide if using Spine makes sense for your installation. I hope you all be able to understand this post well. If you don't understand any point or  have any problem, recommendation, suggestion don't hesitate to tell us, we will try our best to help. 

Notification on Cacti


Cacti provides compatibility to send notification when any events occurred. Notification is every important option for every monitoring system because we cannot look at the computer screen all the times. Notification on Cacti is the way that, Cacti will send message to notify the administrator when any devices down or any abnormal events. So, let’s start how to configure it. First of all, we need to install mail service mostly postfix, and mailx which is the command line utility that allow us to send mail from command line. Cacti can send notification to local mail and external mail like Gmail. 
Install Postfix
Postfix is the mail service on Linux.

yum install postfix -y

Restart postfix service

system restart postfix
systemctl enable postifx

In order to send email from command line on Linux, we need to install mail command utility.

yum install mailx -y

Cacti send notification to local mail

Cacti can send email notification within three of mail services PHP Mail() Function, Sendmail, SMTP. Go to the web interface of Cacti -> Configuration -> Settings -> Mail/Reporting/DNS.


Fill in the following field.
Test Email: the destination email that we want to Cacti to notify for any events.
Mail Services: chose the sending method to send notification
Ping Mail Server: this option is to ping before send
From Email Address:  the source email address of the notification
From Name: it is an alias name.
Next, click on Save and Send a Test Email. We will see the pop-up screen indicate that Test Email Results is Success.


To verify that user jipo surely get the notification message. Go to command line cat /var/mail/jipo. We will see the message in jipo’s mail box.


The other method for sending notification is that using Sendmail option. This option is not much different from PHP Mailer. Go to the web interface of Cacti -> Configuration -> Settings -> Mail/Reporting/DNS. And select Mail services as Sendmail and fill the Sendmail path as /usr/bin/mailx. When we complete the required file Save, and Send a Test Email.


The message indicates the sending status pop-up here.


To verify that user jipo surely get the notification message. Go to command line cat /var/mail/jipo. We will see the message in jipo’s mail box. So, the result is the same right.


Cacti send notification to Gmail

Cacti can be configured to send notification to Gmail. That’s Awesome!!
First, we need to allow Less secure app access on Gmail by follow the link below and then turn it ON. https://myaccount.google.com/lesssecureapps?pli=1


Go to the web interface of Cacti -> Configuration -> Settings -> Mail/Reporting/DNS.
For example I want to send notification from Cacti by using email source@gmail.com and destination email as dest@gmail.com .
Test Email: the destination email that will get the notification for any events notified by Cacti (dest@gmail.com )
Mail Services: chose SMTP because we need to authenticate by SMTP. The idea about SMTP is that we need to login into Gmail before we can send email.
From Email Address: the email address that use to send notification (source@gmail.com )
SMTP Hostname: smtp.gmail.com
SMTP Port: 587
SMTP Username: source@gmail.com
SMTP Password: xxxxx
SMTP Security: TLS
Then click on Save, then Send a Testing Email.


The pop-up message will appear. This message will show whether Test Send is success or failed.


Here below is the message that we send test from Cacti notification.


Conclusion
I hope you all be able to understand this post well. If you don't understand any point or  have any problem, recommendation, suggestion don't hesitate to tell us, we will try our best to help.


How to Install Plugin on Cacti

Cacti Plugins

Not only providing more and more powerful features, Cacti also compatible with many useful plugins to make its productivity more flexible. Cacti support many plugins like Monitor plugin, Thold plugin, Weathermap plugin and many more. In this post we will show how to install plugins on Cacti and we will install Monitor, Thold, and Weathermap.

Monitor Plugins

Monitor plugin enables Cacti to display all hosts status UP or Down on a single page. For the latest Cacti version support some plugins and some not yet, if we use Cacti old version under 0.xx version there are many plugin that it support. For the latest version Monitor plugin is available in Github.com. There are two common ways to install plugin on cacti:

Method #1

Go to https://github.com/Cacti/plugin_monitor and Donwload ZIP then copy by ssh or WinScp or other method to the server.


Method #2

yum install git -y

Copy the URL of that project and clone it with git command.


Clone project with git command.

git clone https://github.com/Cacti/plugin_monitor.git

If we installed cacti with specific version by manually the plugin path is /var/www/html/cacti/plugins/. If we installed Cacti with yum install cacti -y command the plugin path is /usr/share/cacti/plugins. Copy it to the right location and name as monitor.

cp -R plugin_monitor /var/www/html/cacti/plugins/monitor

change ownership to apache user.

chown apache.apache -R /var/www/html/cacti/plugins/monitor/

After we download or clone with git command, copy and name monitor to the correct location, now it is time to install it.

Install Monitor Plugin

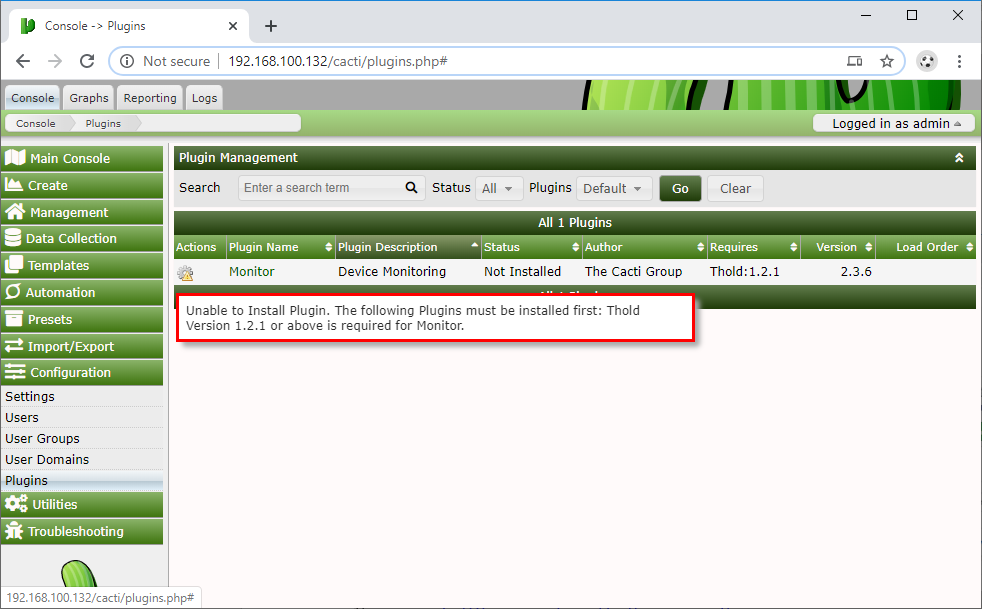
Go to Configuration -> Plugins, we see that our plugin is here move the mouse hover the Setting sign under Actions. There is a warning message.


We notice that, Monitor Plugin requires Thold plugins to make it works.


Go to https://github.com/Cacti/plugin_thold/releases right click on Source code (zip) and Copy Link address.


Download thold plugin with wget command.

wget https://github.com/Cacti/plugin_thold/archive/v1.3.3.zip

Unzip the file with unzip command.

unzip v1.3.2.zip

Move to the right path and name it as thold.

mv plugin_thold-1.3.2 /var/www/html/cacti/plugins/thold

Chang ownership of that directory to apache user.

chown apache.apache -R /var/www/html/cacti/plugins/thold

Install thold plugin
Go to Configuration ->  Plugins click on setting sign.


Now, the thold plugin is installed, click on tick sign to enable it.


Now, we can install the Monitor plugin after the thold plugin is installed. Follow the same step of thold plugin.


Click on the tick sign to enable it.


Check Result

We see that Monitor Plugin tab is shown, and we see that below monitor icons about all devices  and devices are up.


Weathermap Plugin

Weathermap plugin allow us to draw network diagram with the graph view of each link. To install weathermap plugin follow the step below.

git clone https://github.com/thurban/plugin_weathermap.git

Copy to the right directory in Cacti location.

mv plugin_weathermap/ /var/www/html/cacti/plugins/weathermap

Change ownership to apache user.

chown apache.apache -R /var/www/html/cacti/plugins/weathermap

To install Weathermap plugin, we follow the same way as thold and monitor plugin.
Go to Configuration -> Plugins -> 


Click on tick sign to enable it.


Check the Results

We can see that new Weathermap plugin is shown on top of the page.


Conclusion

I hope you all be able to understand this post well. If you have any problem, recommend, suggestion don't hesitate to tell me for the future development.
You may also like:

READ: How to install Cacti on Centos 7 
READ: How to install Cacti specific version on Centos 7 
READ: How to add Windows and Linux host to Cacti
READ: How to create Graph Tree on Cacti

How to monitor Cisco Switch , Router, Linux and Windows on Zabbix

1. Install Zabbix Agent on Rocky Linux 9 Install zabbix repository. rpm -Uvh https://repo.zabbix.com/zabbix/7.0/rocky/9/x86_64/zabb...