
What is Cacti?
Cacti is a complete network graphing solution designed to harness the power of RRDTool's data storage and graphing functionality. Cacti provides a fast poller, advanced graph template, multiple data acquisition methods, and user management features out of the box. All of this is wrapped in an intuitive, easy to use interface that makes sense for LAN-sized installations up to complex networks with thousands of devices. In this post How to install Cacti on Centos 7 we install Cacti with yum command. Cacti latest version will be installed from the repository. For some cases, we want to install specific version that mean we select which version we want to install. For example: we want to install Cacti old version 0.8.8h, version 1.2.9 and so on. In this post we will show how to install and configure Cacti specific version on Centos 7.Package Requirements
- RRDTool
- MySQL
- PHP
- Apache
Update System
yum update -y
Install Apache
yum -y install httpd httpd-devel
Restart Apache service and Enable Apache auto start up when server startup.
systemctl restart httpd
systemctl enable httpd
Install Net-SNMP and RRDTools
yum -y install net-snmp net-snmp-utils net-snmp-libs rrdtool
Restart Apache service and Enable Apache auto start up when server startup.
systemctl restart snmpd
systemctl enable snmpd
systemctl enable snmpd
Install PHP and PHP Extensions
The current Cacti version requires PHP 7.2+, so we need to install from Remi repository because, by default the PHP version which available in base OS repository is version 5.4. Create Remi Repository with below command.
yum install -y https://rpms.remirepo.net/enterprise/remi-release-7.rpm
Install PHP 7.3 from Remi repository.
yum install -y --enablerepo=remi-php73 php php-xml php-session php-sockets php-ldap php-gd php-gmp php-intl php-mbstring php-mysqlnd php-pdo php-process php-snmp
PHP recommended to change the following settings in /etc/php.ini file. Before make change please verify the timezone on our system.
ls -l /etc/localtime
vi /etc/php.ini
date.timezone = Asian/Phnom_Penh
memory_limit = 512M
max_execution_time = 60
memory_limit = 512M
max_execution_time = 60
Install MariaDB
By default, MariaDB v5.4 is available in base Centos repository. The current Cacti version recommended MariaDB v5.6+. We will install MariaDB v10+, so need to create new repository for MariaDB. Create new repository.
vi /etc/yum.repos.d/mariadb.repo
[mariadb]
name = MariaDB
baseurl = http://yum.mariadb.org/10.4/centos7-amd64
gpgkey=https://yum.mariadb.org/RPM-GPG-KEY-MariaDB
gpgcheck=1
name = MariaDB
baseurl = http://yum.mariadb.org/10.4/centos7-amd64
gpgkey=https://yum.mariadb.org/RPM-GPG-KEY-MariaDB
gpgcheck=1
Install MariaDB with below commands.
yum install -y MariaDB-server MariaDB-client
Restart MariaDB and enable to auto start when server start.
systemctl restart mariadb
systemctl enable mariadb
systemctl enable mariadb
Create Database
The password is not set for MariaDB, so we need to so secure with command below.
mysql_secure_installation
Login into our database with password just set at the moment.
mysql -u root -p
Create database and username for Cacti.
create database cacti;
GRANT ALL ON cacti.* TO cactiuser@localhost IDENTIFIED BY 'p@$$w0rd';
flush privileges;
exit;
GRANT ALL ON cacti.* TO cactiuser@localhost IDENTIFIED BY 'p@$$w0rd';
flush privileges;
exit;
we need to grant access to the MySQL TimeZone database for user Cacti, so that the database is populated with global TimeZone information.Import database to mysql_test_data_timezone.sql first.
mysql -u root -p mysql < /usr/share/mysql/mysql_test_data_timezone.sql
Login into our database again.
mysql -u root -p
Grant permission to cactiuser.
GRANT SELECT ON mysql.time_zone_name TO cactiuser@localhost;
flush privileges;
exit;
flush privileges;
exit;
Optimize Database
To improve performance Cacti recommended to optimize some setting in database. Edit /etc/my.cnf.d/server.cnf file.
vi /etc/my.cnf.d/server.cnf
Add below lines under [mysql] section.
# this is only for the mysqld standalone daemon
[mysqld]
collation-server = utf8mb4_unicode_ci
character-set-server=utf8mb4
max_heap_table_size = 64M
tmp_table_size = 64M
join_buffer_size = 64M
innodb_file_format = Barracuda
innodb_large_prefix = 1
innodb_flush_log_at_timeout = 3
innodb_buffer_pool_size = 1GB
innodb_buffer_pool_instances = 10
innodb_read_io_threads = 32
innodb_write_io_threads = 16
innodb_io_capacity = 5000
innodb_io_capacity_max = 10000
Install and Configure Cacti
We to need to download Cacti package from https://www.cacti.net/downloads. We need some command utilities to download Cacti. First, install wget for download and unzip for unzip the zip file.
yum install -y wget unzip
Download Cacti with wget command
wget https://www.cacti.net/downloads/cacti-1.2.9.zip
Unzip the file that we downloaded at the moment with unzip command.
unzip cacti-1.2.9.zip
Move it to the document root of apache /var/www/html and name it as cacti.
mv cacti-1.2.9 /var/www/html/cacti
Create cacti.log file to store cacti log if it does not exist, please create it.
touch /var/www/html/cacti/log/cacti.log
Change ownership to web user to able to read and write this directory.
chown -R apache.apache /var/www/html/cacti/
import database to cacti.
mysql cacti < /var/www/html/cacti/cacti.sql -u root -p
Configure database for cacti.
vi /var/www/html/cacti/include/config.php
/* make sure these values reflect your actual database/host/user/password */
$database_type = “mysql”;
$database_default = “cacti”;
$database_hostname = “localhost”;
$database_username = “cactiuser”;
$database_password = “p@$$w0rd”;
$database_port = “3306”;
$database_ssl = false;
Create Cron Job$database_type = “mysql”;
$database_default = “cacti”;
$database_hostname = “localhost”;
$database_username = “cactiuser”;
$database_password = “p@$$w0rd”;
$database_port = “3306”;
$database_ssl = false;
Cacti need to run its query script to collect information from end devices that we monitor for regularly. Mostly, we schedule Cacti to run poller script every 5 minutes.
echo '*/5 * * * * apache /usr/bin/php /var/www/html/cacti/poller.php > /dev/null 2>&1' >/etc/cron.d/cacti
Allow Firewalld
firewall-cmd --permanent --add-service=http
firewall-cmd --reload
Disable Selinuxfirewall-cmd --reload
sed -i 's/enforcing/disabled/g' /etc/selinux/config
setenforce 0
setenforce 0
Restart services.
systemctl restart {httpd,mariadb,snmpd}
Setup CactiOpen favorite web browser and type http://server_ip/cacti (our server IP, or domain name).Cacti requires us to change the default password for the first login. The new password should contain lowercase, uppercase letter, special characters and number.

Select the language and Check the Accept GPL License Agreement box and Begin.

In this section Cacti performs Pre-Installation Checks, if there is any recommend setting or missing setting will be shown here. Next.

Choose the Installation Type, in this case we choose the New Primary Server because we have only Cacti server and it is primary server. Next.

Directory Permission check, this section Cacti validates the directory permission, if there is any missing permission setting will be shown here. All these directories need to be owned by the Web Service user (Apache). Next.

This is the critical Binary that Cacti will use for its operation.

In this version Cacti have enhanced the security option for data input method, check the box I have read this statement and Next.

This is the Default Profile of Cacti, we can change this option later after the installation is finished. Keep default setting and Next.

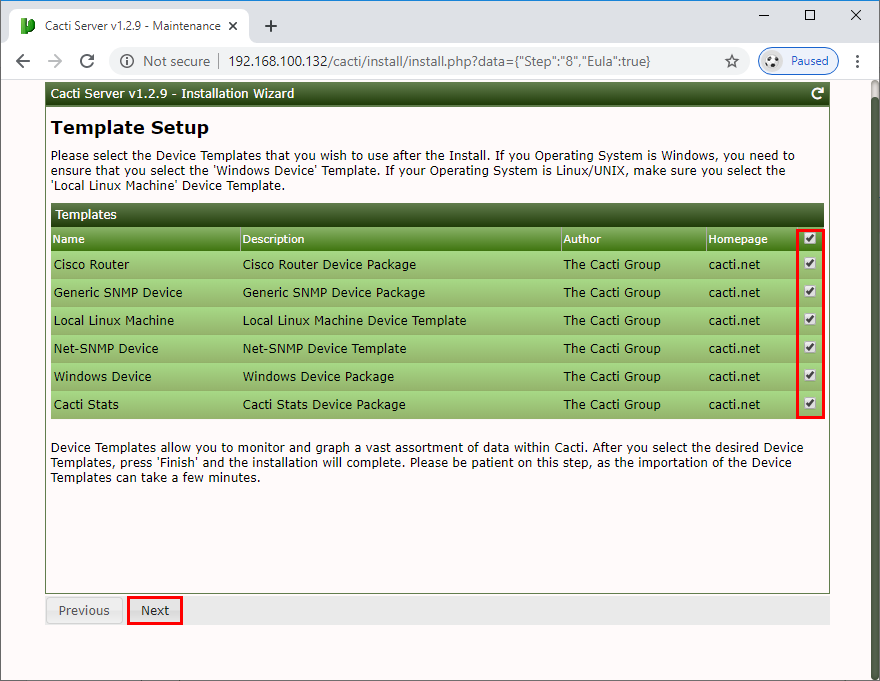
Here below are the default Template of Cacti, this option should be checked all and we will see it all of these option when we add new host. Next.
In this section cacti show the summary of character set of the database, if there is any recommend setting will be shown here related to database.

Check the Confirm Installation box and Install.

The Cacti Installation is almost done. Click on Get Started to finish our installation.

Now, we are done for cacti version 1.2.9 installation.

Conclusion
I hope you all be able to understand this post well. If you don't understand any point or have any problem, recommendation, suggestion don't hesitate to tell us, we will try our best to help. You may also like Related Posted:
READ: How to add Windows and Linux host to Cacti


